Image to 3D Model AI: Fixing Seamless Texture Generator Repeats
Using image to 3d model ai? This guide shows how to tell a texture seam from normal repetition and fix gradients, lighting, and weak source photos.
If you use image to 3d model ai, texture problems can carry into the finished material. This guide explains why seamless textures still repeat and how to distinguish a seam from normal tiling before fixing it.
Removing the seam does not remove the fact that a texture is a tile. This troubleshooting guide separates an actual edge mismatch from normal repetition, then shows how to fix gradients, dominant features, mirror symmetry and weak source photos.
The short version
- A visible line, cross or abrupt change means the tile edges still disagree. Repeating stones, knots or highlights without a line are a repetition problem, not a seam.
- Use the 3×3 or 4×4 preview from a distance. A tile that looks fine up close can still repeat obviously at material scale.
- Keep Offset & blend for natural surfaces, use Mirror only when reflected symmetry is acceptable, and leave Detail-aware blend on.
- Fix uneven lighting before adjusting the blend. Then make the color tileable before generating normal, height, AO or roughness maps.
Seam or repetition? Start with the diagnosis
A seamless texture only promises continuity at the borders. The left edge must continue into the right edge, and the top edge must continue into the bottom edge. It does not promise that each copy will look different from the next one.
That distinction matters because the fixes are different. A seam needs better edge blending or lighting correction. Repetition needs a better source, a larger tile scale, more variation in the material, or a different way of building the surface.
I start with the seamless texture generator and look for a discontinuity rather than judging the whole image as a pattern. A dark rock appearing at regular intervals is expected from a tile. A thin bright line running through every join means the borders still disagree.
A cross-shaped mark in the center of an offset preview is another clue. The offset operation moves the original edges into the middle of the image. If the blend is too weak, the former borders remain visible there. That is a seam left in the tile, not ordinary repetition.
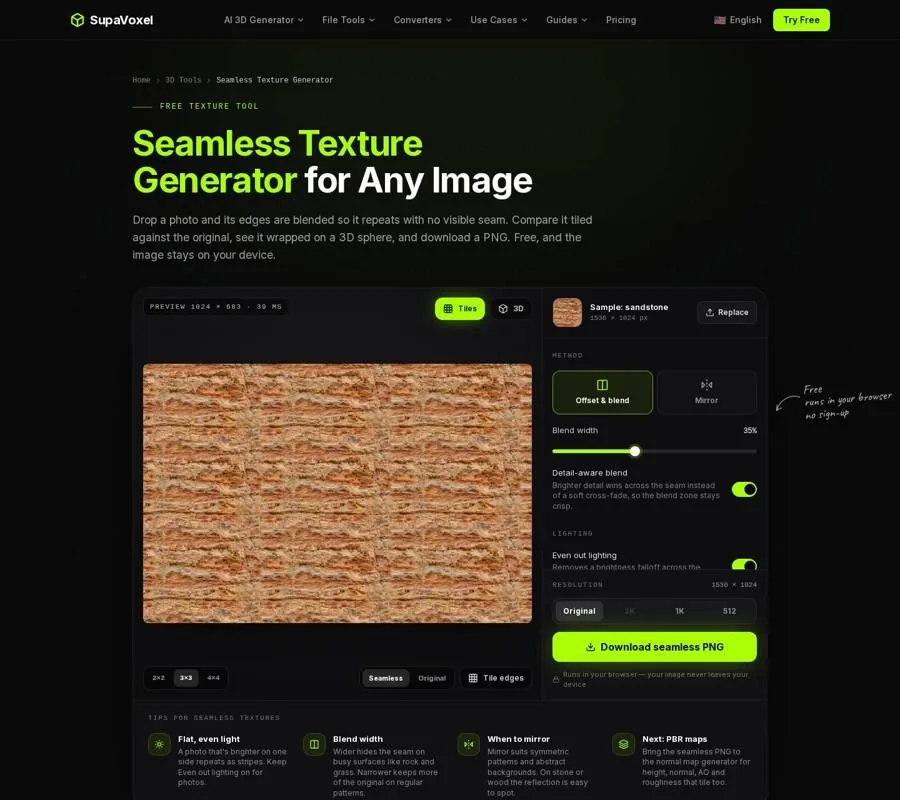
The tile preview makes it easier to separate a hard edge from a feature that simply repeats.
Use the tile preview before changing settings
The single-image view can hide problems because your eye adapts to the frame. A repeated preview exposes what happens after the texture wraps.
Check the result in this order:
- Switch between Seamless and Original. This shows what the tool changed and whether the correction introduced a soft patch or broad blur.
- Turn on Tile edges. If the line follows the copy boundaries, it is an edge problem. If the texture looks continuous across the boundary but the same feature appears in every tile, it is repetition.
- View the result as 3×3 tiles first, then 4×4 if the material will cover a large area. Step back from the preview. Repetition often becomes obvious at scale rather than up close.
- Open the 3D view and inspect the texture on a sphere, cube or plane under moving light. A pattern that looks acceptable on a flat square may become distracting when it wraps around a curved form.
Do not judge the tile only by the center of the image. A broad dark region, a large crack or a bright patch can dominate every copy even when the borders are perfectly joined.
Gradients create false seams
A light-to-dark falloff is one of the most common reasons a texture appears to form a checkerboard. Imagine a photo of a wall with the top left brightly lit and the bottom right in shade. Once repeated, the bright and dark corners meet in alternating directions. The result may look like a grid even though the edge colors technically blend.
For photographs, keep Even out lighting enabled. The tool removes the broad light falloff before or during the seamless treatment, so the tile is less likely to repeat a lighting gradient. This is especially important for stone, plaster, bark and other surfaces photographed under directional light.
If the source is a flat graphic, ornament or pattern with intentional solid colors, turn that setting off. Lighting correction can change colors that were meant to remain exact.
A gradient can also be mistaken for a blend problem. Widening the blend band may soften the transition, but it will not fix a strong illumination pattern across the entire source. Correct the source first when possible: shoot in even light, use shade or overcast conditions, and avoid a bright hotspot across one edge.
Dominant features repeat even in a perfect tile
Blending cannot invent new structure. If the source contains one unusually dark stone, a large knot in wood, a bright painted mark or a distinctive crack, that feature will appear once per tile. No edge correction can make the copies disappear.
This is where many “seamless” materials fail. The technical join is clean, but the eye follows the repeated feature and recognizes the pattern immediately.
Use a source with more evenly distributed detail when you can. Crop away a dominant object, choose a larger photo that contains more of the surface, or combine variation in the material after the tile is made. A larger tile scale also reduces how often the feature appears across the model.
Exact repeating graphics need a different approach. For stripes, grids or brick courses with a known period, cropping exactly one repeat is sharper than blending. The seamless tool can make a drawing tileable, but a blend is not a replacement for aligning a regular pattern precisely.
Mirror can remove seams and add symmetry
Mirror is useful when reflected structure looks natural. It places the image beside its reflections, producing a tile that is always seamless and twice as wide and tall. There is no hard edge to diagnose, but the reflected arrangement may be easy to see.
That makes Mirror a poor choice for many natural materials. Stone, wood and fabric usually do not look convincing when the same grain or crack appears as a reflection. The eye notices bilateral symmetry even when there is no line at the join.
Use Offset & blend for natural surfaces. It keeps the image at its original size and hides the edge transition inside a blended band. Reserve Mirror for abstract designs, ornamental graphics and patterns that already tolerate symmetry.
With Offset & blend, leave Detail-aware blend on for most photos. A plain cross-fade treats both sides equally and can produce a blurry, washed-out cross. Detail-aware blending gives stronger detail more influence across the transition, which usually preserves surface character better.
Change the source before over-tuning the settings
When the problem is clear, I use this adjustment sequence:
- Start with the largest source available. Upscaling a small image to 4K only makes it softer; it does not add surface structure.
- Prefer a straight-on photo with even lighting. Perspective and strong shadows make it harder to tell surface detail from lighting.
- Choose Offset & blend for rock, grass, plaster, wood or fabric. Try Mirror only when reflected structure looks intentional.
- Keep Even out lighting on for photos. Turn it off for flat graphics and patterns.
- Keep Detail-aware blend on unless the result looks too sharp at the transition.
- Adjust Blend width only after checking the source. The setting ranges from 5–80%, with 35% as the default. A wider band can help irregular surfaces; a narrower band is better for regular patterns.
- Inspect the result in the repeated preview and from a distance. If the joins disappear but one feature still repeats, stop widening the blend and change the source or scale instead.
A good troubleshooting habit is to save the cleanest color result before generating any secondary maps. A texture that is slightly repetitive in color will be even more obvious when the same crack becomes a repeated ridge in the normal map.
Make the color tileable before building PBR maps
Normal, height, ambient occlusion and roughness maps describe the surface structure of the color image. If the source has a visible edge or lighting gradient, those problems can become geometry-like detail in the exported maps.
After the color tile looks continuous, use the normal map generator to derive the rest of the material. Its filters wrap around the edges of a seamless image, so the normal, AO and roughness results can tile with the color instead of creating a mismatch at every boundary.
The photo still needs to be suitable for this kind of conversion. Bright areas are treated as raised and dark areas as recessed, so hard shadows, glare and painted contrast can turn into false relief. Use a straight-on image in soft light, check the 3D preview under moving light, and keep the normal strength restrained. A strong map can make every repeated grain look like a repeated crater.
If a model already has a texture layout, the tile itself is not the same thing as UV placement. UV coordinates decide how the image is distributed over the mesh. For a model with missing or overlapping coordinates, the uv unwrap tool can create a non-overlapping layout and show it with a checker preview. That helps identify stretching or chart seams, which are separate from visible repetition in the texture.
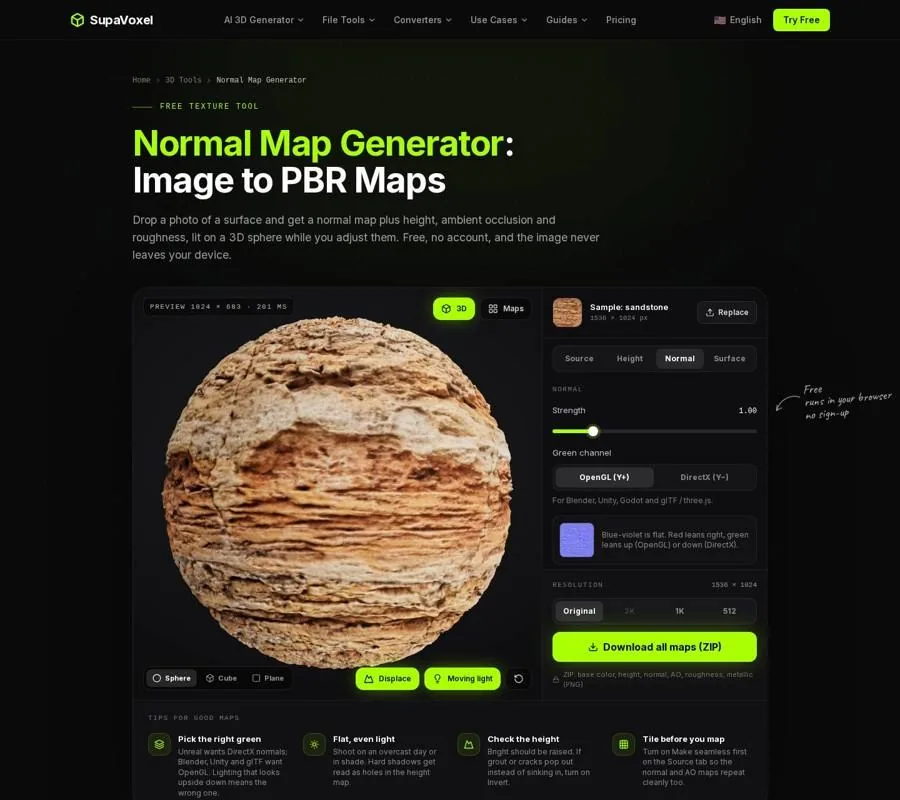
The normal map workflow is best used after the color image has already been made tileable.

The checker preview helps distinguish UV stretching from a repeating pattern in the material itself.
Know when you need a different kind of texture
A tileable material and a textured object are different jobs. A reusable wall, floor or fabric material needs a repeatable color image and matching maps. A character or prop generated from a single picture needs a texture painted onto that particular model.
The ai texture generator builds a new 3D model and paints its texture in the same run. That texture belongs to the generated mesh; it is not a reusable tile for another surface. If the goal is a material that repeats across a level, start from a surface photo and solve the seam and repetition problems directly.
FAQ
Why is my texture seamless but still obviously patterned?
Seamless means the borders connect without a visible break. It does not remove distinctive features from the source. A large stone, crack or bright mark will still appear in each copy. Use a less distinctive source, a larger tile scale or added variation in the material.
Should I increase Blend width when I see repetition?
Only when the repetition is caused by a visible transition at the former image borders. A wider blend can hide a seam, but it cannot remove a dominant feature that repeats throughout the tile. If the edges already look continuous, change the source or use a different scale instead.
Why does Mirror look clean but unnatural?
Mirror creates a seamless reflected arrangement, so the absence of a seam is expected. Natural materials often reveal the symmetry because cracks, grain and highlights appear as mirrored pairs. Use Offset & blend for those surfaces and keep Mirror for patterns that tolerate reflection.
Want to try it yourself?
Try Supavoxel →